How to add a layer with a thickness over a ViP model, e.g., clothing?
-
NOTE: This feature is only available with Sim4Life V6.2.1. At the time of publishing this post, this version has not been released yet.
- Load a ViP model shell into the project. There is one example shell distributed with the tutorials. Other shells will be made available in the future. (Alternatively, the skin of a model can be used, but might be much slower to process)
- Select the shell model entity and from the ribbon, select Mesh Tools | Mesh Doctor
- From the Options window, select Make Manifold
- Create a block or cylinder covering the parts of the body to be covered by an extra thicker layer
- Multi-select the Skin and the Block. From the ribbon, select Mesh Tools | Intersection patch
- Select the newly created patch. From the ribbon, select Mesh Tools | Extrude Patch
- Assign a thickness in the Options window and select Run
-
Hello. Thank you for showing such nice example. I have a question, is Sim4Life V6.2.1 available now? In my sim4life update tool, the latest version showing for download is V6.2.0.4280.
Best regards
Suchit -
Hi Habib,
Thanks for the demonstration. I have two questions:
-
I use Sim4Life V6.2.2.5984 for science. When I select Mesh Tools, the Mesh Doctor option does not appear and I, therefore, can't select Make Manifold.
-
Say I wanted to create multiple layers of clothing, e.g. a vest, then a shirt, then a jersey, and finally a coat. How would I go about doing this using your method?
-
-
Hi @sipho-mfolozi
I think the Mesh Doctor should be available in Sim4Life for science. I think it is part of the basic framework.
Regarding your second question, you have two options:
- you extrude multiple times with different thickness value. this will create overlapping regions - in the voxeler you need to specify the priorities
- you create a patch on the first layer (only the outer surface) and extrude from there (see animation below)
-
 O ofli referenced this topic on
-
Hi,
Just to confirm, would the clothing deform with soft tissues if the pose of the model is changed?
Thanks,
Vignesh -
@VigneshYork you can assign the clothing surface model as "User Defined Mesh" in the Poser tool. After doing this, the clothing entity will have a lock symbol, because is linked to the posable model.
While the deformation assumes the user-defined mesh is inside the body, it should behave correctly for thin layers on the skin. For mesh parts that are outside the body, the implementation will use nearest-neighbor interpolation to extrapolate the deformation.
-
Hello Bryn,
Thank you. Would like to confirm two additional points:
- Can this be applied to antennas also? I would like to mimic wearable antennas in different poses without having to move them at each pose?
- Can posing followed by simulation we done programatically so that it is automated without needing for manual meshing after posing ?
Thanks
-
hi @VigneshYork.
I recently wrote a script to transform a phone following the movement of a triangle in the posable model (or three vertices), e.g., on the hand. Simply assigning the phone as "User Defined Mesh" may not work nicely, since you
- have to convert the phone to a triangle mesh
- the phone may deform (unrealistic)
instead, you can do the following:
- you create three vertices, e.g. on the skin near where the phone is placed (unposed)
- you add these vertices as "User Defined Meshes"
- you store the initial position of the three points (e.g. on the hand):
tri_0 = [verts[0].Position, verts[1].Position, verts[2].Position] - you compute the position of the three points in a different posture:
tri_p = [verts[0].Position, verts[1].Position, verts[2].Position] - you compute the rigid transformation from the base triangle
tri_0to the posed triangletri_p - this can be done using:
tr = XCoreMath.RigidTransform(tri_0, tri_p) - apply this relative transform to the EntityGroup containing the phone/device:
phone_group.ApplyTransform(tr)
You can also programmatically (maybe since Sim4Life 7.2, or in the upcoming 8.0) apply different postures stored in a posture file using the Python API (see attached file apply_postures.py for reference)
-
Hi Bryn,
Thanks. I shall try that today. Just to check, would it work in sim4life 7.0.1 (the version I have)?
Thanks
-
available in 7.2
XCoreMath.RigidTransformXPoser.ApplyPostureXPoser.CloneAsStatic
available in 7.0.1
XCoreMath.RigidTransform
please note these API functions are not yet in the
s4l_v1, i.e. the signature may change if we believe it improves the feature. -
Thank you
-
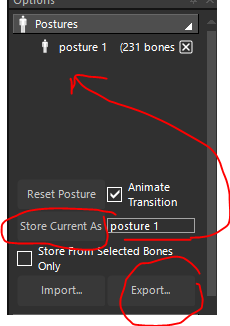
How to save postures in a folder? I tried cloning the model as static after posing but not sure how to save the file as *.pose?
-
- to store the current posture, type a name and press "Store Posture As". this will add the posture to the list above
- to delete one of the postures, press the "X" button next to the posture
- to export the postures press "Export" and type a filename
- to import press "Import"
-
Hi,
Thank you.
Regards,
Vignesh -
Hello,
Sorry I am facing an issue with moving antennas to different locations based on the steps above. I used three points on the skin and calculated the transformation between static and posed states. I used this transformation to transform the antenna position to the new position (using RigidTransform and ApplyTransform functions).
However I get errors that the antenna source edge is within a solid. I have changed priorities during voxelling providing antennas higher priority but the errors still exist. What can I do? I would like to move antennas in a similar fashion to how soft tissues deform.
Thanks
Vignesh -
S sanand referenced this topic on
Hello! It looks like you're interested in this conversation, but you don't have an account yet.
Getting fed up of having to scroll through the same posts each visit? When you register for an account, you'll always come back to exactly where you were before, and choose to be notified of new replies (either via email, or push notification). You'll also be able to save bookmarks and upvote posts to show your appreciation to other community members.
With your input, this post could be even better 💗
Register Login